Teams Hub
- The integration with the Teams application is accomplished by installing the SmartHub Teams application in your tenant or a specific Team.
- The integration is compatible with both the web and the desktop version of Teams.
The SmartHub Teams app exposes 3 types of integrations:
- Message extension – Enables you to run searches and embed results as part of your messages in Chat.
- Personal Tab extension – Enables you to access the full functionality of the SmartHub center directly from Teams.
- Teams Tab extension – Enables all the members of your team to access the full functionality of the SmartHub center directly from the Team tabs.
Prerequisites
- SmartHub must be installed and accessible using HTTPS
- This requires a trusted, valid certificate to be configured in the IIS bindings
- Supported Authentication: Only “Azure AD” or “Federated authentication”
- Windows Authentication is unsupported
- If you plan to install the Hub for only some Teams then the Teams external app installation switch needs to be enabled to side-load applications – see Admin settings for apps in Microsoft Teams.
If you do not configure the Teams Hub correctly, it is made available to the entire Organization. Any user will be able to install the Hub for himself or the Teams he is a member of.
Additional Message Extension Requirements
In Teams, the message extension functionality is based off the Microsoft Bot Framework infrastructure. As a result there are some specific requirements for this feature to work:
- An Office 365 account with permissions to register a Bot service.
- SmartHub needs to be accessible from the internet for the Bot Framework to reach it.
- A bot needs to be registered and configured in the Microsoft Bot Framework Portal – see the Register the SmartHub Teams Bot section.
How to Register the SmartHub Teams Bot
- Navigate to Bot Framwork Portal.
- Click on the Create a bot button and then on the Create bot button.
- You are redirected to the Azure portal Bot Service Blade.
- Click on Bot Channels Registration and then click Create.
- Enter a Bot name.
- Choose the Subscription.
- Select a Resource Group (or create a new one).
- Choose a Location.
- Select a Pricing Tier.
- Enter the Messaging endpoint in the following format: https://smartHubAddress:port/api/message.
Examplehttps://smarthub.contoso.com/api/messageEnsure that the URL you entered is accessible from the internet - Click Create.
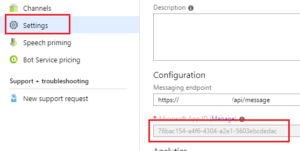
- After the Bot service is created you are redirected to the Edit page for the new Bot service.
- Click on Settings section and take a note of the Microsoft App ID value which is required later on.
- Click on the Channels section and choose the Teams channel from the Add a Featured channel section.
- Click Save.
How to Configure the App
To install the app you must first update the manifest with your own configuration details:
- Navigate to the installation directory of your SmartHub website.
- Open the integrationsmsteamsSmartHubApp folder.
- Edit the manifest.json file as instructed in the following sections.
Personal Tab Settings
This is used for configuring what page the Personal tab of the users that install the Hub will display. If you want to fully disable this functionality remove the entire staticTabs node and its children from the manifest.
Look for staticTabs property and change the contentUrl and websiteUrl to point to your SmartHub address
Example
“contentUrl”: “https://smartHubAddress:port/integrations/msteams/”
URL Notes
Make sure the contentUrl points to a SmartHub page that is a customized version of the index page that the Teams Hub comes with (which is found in the integrationsmsteams subfolder from SmartHub).
Messaging Extension Settings
This is used for configuring what bot the Messaging extension communicates with. If you want to fully disable this functionality remove the entire composeExtensions node and its children from the manifest.
- Look for composeExtensions and change the botIdproperty by replacing it with Microsoft App ID that you noted down during the Bot Service creation
Team Tab Extension Settings
This is used for configuring what page should be opened when users navigate to the SmartHub Tab in their Team. If you want to fully disable this functionality remove the entire configurableTabs node and its children from the manifest.
- Look for configurableTab and modify the configurationUrl to point to your SmartHub address – make sure you leave the following relative path in the URL:
/integrations/msteams/ConfigPage.html - If you want to point the Team Tab to a custom page that is based on the default Index and Results pages from Teams you must append the following to the end of the URL:
?address=<address to the page that should be opened by the tab>
- By default, it automatically opens the built-in /integrations/msteams
After Settings Are Complete
- Save the changes and go to the parent directory: integrationsmsteams.
- Go to SmartHubApp directory and select all (CTRL + A) files inside. Right-click the files and choose the Send To → Compressed (zipped) folder
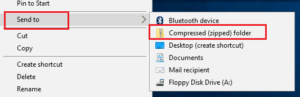
- After the archive is created, copy it to the environment where you have the Teams desktop client installed.
How to Install the SmartHub Teams App
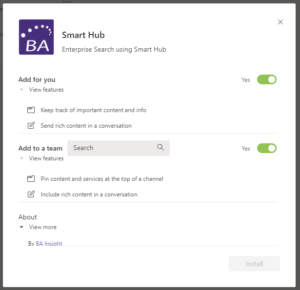
The SmartHub Teams App can be installed at 3 levels:
- Me or My Teams → Personal (Add for you)
- The Messaging extension is installed only for you
- The Personal Tab extension is installed to your account
- The Team Tab extension is not installed
- Me or My Teams → Team (Add to a team)
- The Messaging extension is installed for all of your team members
- The Personal tab extension is only installed to your account
- The Team Tab extension is installed for the Teams you select
- Organization
- The app is uploaded and made available for all of your users but is not automatically installed to any user or team.
How to Install the Teams App for a Specific User or Team
Navigate to the Store and click on Upload a custom app → Upload for me or my teams and select the ZIP file created in step 2 in the topic After Settings Are Complete.
How to Make the Teams App Available to Your Organization
Navigate to the Store and click on Upload a custom app → Upload for [OrganizationName] and select the ZIP file created in step 2 in the topic After Settings Are Complete.
This does not install the application but makes it available under the Store → [Organization Name] sub-section.

Now you and everyone from your organization can select the Teams app and install it personally or to any Team the user owns.
How to Uninstall the SmartHub Teams App
The SmartHub Teams App must be uninstalled from 4 sections, or tabs, listed here:
- Personal tab
- Team tab
- Conversations tab
- <Your Custom Named> SmartHub tab
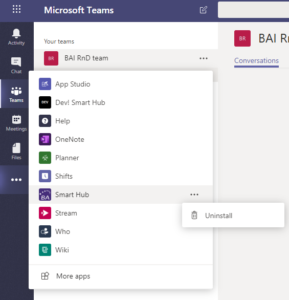
Personal Tab
- Select Teams from the right side menu.
- From the menu, select SmartHub.
- Click the dots icon “…” and select Uninstall.
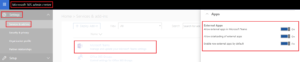
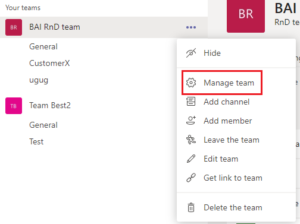
Team Tab
- Click the icon More options.
- Click Manage team.
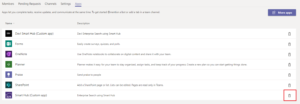
- On the top, horizontal menu, select Apps.
- Click the trash can icon to delete your (custom) Smart Hub app.
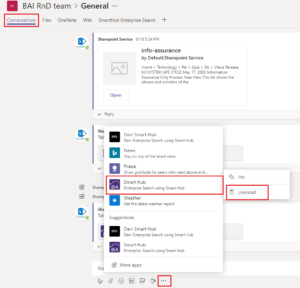
Conversations Tab
- Go to your team’s General page.
- Go to the Conversations tab.
- Click on the Messagingextensions icon.
- Go to the Smart Hub App and click “Uninstall.”
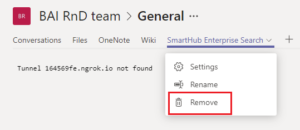
Remove <YourCustomNamed> SmartHub
Remove “SmartHub Enterprise Search” (or the name of your SmartHub) Tab:
- Go to your team’s General page.
- Select your SmartHub from the top horizontal menu.
- Click Remove.